

Annapolis’s coastal climate is relentless on exterior paint. Humid summers, salt air, intense sun, and harsh freeze-thaw cycles wear down even the toughest finishes. When paint begins to fail, it’s more than a cosmetic flaw—it’s a signal that your home’s first line of defense is breaking down. Left unchecked, minor paint issues can escalate into major structural problems, including rot, mildew, and water damage. Recognizing these warning signs early helps homeowners save money and avoid costly repairs down the line.
The Role of Paint in Protecting Your Home
Exterior paint does far more than make your house look good. It serves as a vital barrier, blocking harmful UV rays, repelling water, and sealing small gaps where moisture can enter. When paint is healthy, it keeps your siding dry and protected. But as the coating deteriorates, water seeps in, wood swells, and mildew takes hold. This sets the stage for rot and long-term damage. A strong paint system—sound substrate, targeted primer, and quality topcoats—keeps your home safe from the elements.
1. Peeling and Blistering: The Most Obvious Warning Sign
Peeling and blistering are unmistakable signals that paint adhesion has failed. In Annapolis, these issues are especially common on sun-exposed trim, lower clapboards, window sills, and door frames. These areas face the brunt of sun, moisture, and runoff, making them prime spots for paint failure.
What Causes Peeling and Blistering?
-
Oxidation or dirt left on the surface before the last repaint
-
Moisture trapped behind the paint film due to failed caulk or unprimed wood
-
Heat blisters from dark colors on sun-exposed boards
How to Address Peeling Paint
-
Remove all loose paint to a firm edge
-
Feather-sand the surrounding areas for a smooth transition
-
Spot-prime bare wood with a bonding or tannin-blocking primer
-
Seal end-grain and horizontal surfaces thoroughly
-
Re-caulk open seams, then apply two finish coats matched to exposure
2. Hairline Cracking and Alligatoring: Water’s Hidden Highway
Tiny cracks may seem minor, but they create pathways for water to penetrate. On fascia boards, window trim, and door casings, these cracks expand and contract with temperature changes, drawing moisture into the wood. Over time, this leads to rot and structural damage.
Why Cracking Occurs
-
Aging paint loses flexibility and becomes brittle
-
Too many paint layers create a rigid shell
-
Unsealed joints or failing storm windows concentrate heat and stress
How to Fix Cracking
-
Scrape and sand until the surface is smooth
-
Use a high-build bonding primer to bridge microchecking
-
Replace boards that are deeply checked through the grain
-
Finish with flexible, UV-stable topcoats to prevent future cracking
3. Fading and Chalking: The Sun’s Silent Attack
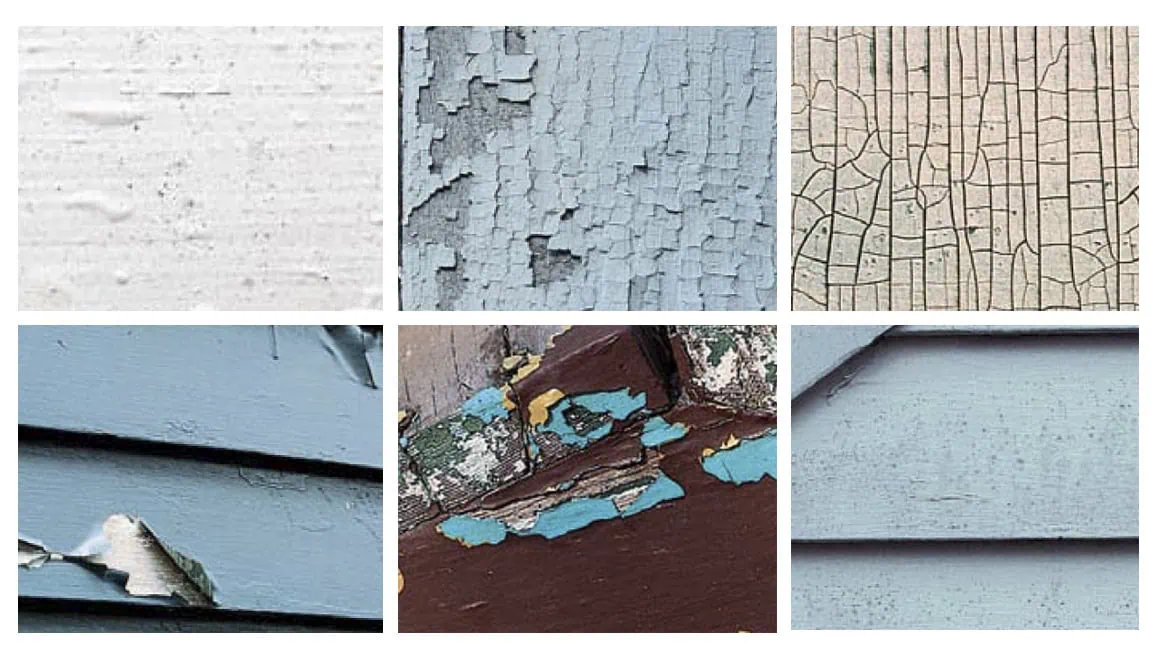
Rub your palm across a sunny clapboard. If you come away with a white or tinted powder, the paint binder has oxidized—a sign of UV damage. South- and west-facing elevations are most vulnerable to fading and chalking.
Why Fading and Chalking Matter
-
Chalk blocks adhesion, making it hard for new paint to bond
-
Color loss often means resin loss, reducing water shedding
-
Uneven fading signals where stronger UV-resistant coatings are needed
How to Address Fading and Chalking
-
Wash the surface with low pressure to remove chalk
-
Mechanically dull slick areas (hand-sand for best results)
-
Prime with a quality acrylic primer
-
Choose high-quality acrylic topcoats with strong UV resistance
-
Consider adjusting color on the harshest elevations
4. Open Seams and Failing Caulk: The Moisture Highway
Paint is only as good as the seams it covers. When caulk shrinks, splits, or pulls away, moisture finds its way behind even “good-looking” paint. This is a major cause of water damage and rot.
Where to Check for Caulk Failure
-
Vertical butt joints on lap siding
-
Trim-to-siding transitions
-
Window and door perimeters
-
Miter joints on exterior casings
-
Utility penetrations (hose bibs, vents, cable entries)
How to Fix Caulk Issues
-
Remove failed caulk
-
Backer-rod deep gaps
-
Use a quality paintable elastomeric or high-grade siliconized acrylic
-
Tool a smooth bevel to shed water
-
Prime raw edges, then seal with two finish coats
5. Early Wood Distress: The First Sign of Rot

You don’t need crumbling boards to have trouble. Early rot shows up as dark discoloration at nail heads, shadowy halos under peeling paint, or softness in trim ends and lower clapboards. Mildew on paint is mostly cosmetic, but mildew tracking along split seams or end-grain hints at water intrusion.
Where Wood Distress Starts
-
Window sills and door bottoms
-
Trim ends that meet roofs or decks
-
Kick-out flashing areas
-
Deck-to-siding transitions
How to Address Wood Distress
-
Dry the area thoroughly
-
Replace decayed wood rather than burying it under filler
-
Use epoxy consolidants only where structural integrity remains
-
Prime cut ends twice, then paint
-
Adjust drainage and splash sources
Annapolis-Specific Factors That Accelerate Paint Failure
-
Salt air and bay breezes: Dry coatings quickly, tempting thin coats that fail sooner
-
Freeze–thaw cycles: Push water behind marginal seams
-
Intense summer UV: Breaks down south- and west-facing elevations first
-
Tree shade: Keeps surfaces damp longer after rain, feeding mildew and slow rot on north elevations
How to Perform a Simple Exterior Self-Check
-
Walk your home at mid-morning and near sunset
-
Start at ground level, noting splashback zones and the first two courses of clapboard
-
Scan south and west elevations for chalk and microcracks; north for mildew and soft trim
-
Probe the skin and trim ends with a skewer
-
Photograph each elevation and mark issues
-
If more than 10–15% of a surface is failing, plan for full prep and repaint
What to Expect from a Professional Paint Prep
-
Washing: Low-pressure rinse, detergent to remove salt, pollen, mildew, and chalk
-
Surface repairs: Replace rotted boards, reset or replace fasteners, patch checks, sand edges smooth
-
Priming: Match primer to substrate—stain-blockers for tannin woods, bonding primers for weathered acrylic, metal primer for railings and nails
-
Caulking: Backer rod where needed; high-grade, paintable sealants at all transitions and penetrations
-
Topcoats: Two coats of quality exterior acrylic tuned to exposure
-
Details: End-grain sealing, sill bevels, drip edges, and visible film build on horizontal faces
Choosing the Right Colors for Annapolis Homes
-
Balanced mid-tones outlast ultra-pale shades on sunniest faces
-
Satin or low-luster sheens shed water better and resist dirt pickup
-
Coordinated trim contrasts help spot early cracks and gaps
Maintenance Rhythm for Annapolis Bay Climate
-
Spring: Rinse salt and pollen, check caulk at windows and doors
-
Mid-summer: Quick chalk test on sunny sides; touch up hairline cracks
-
Fall: Clear gutters, confirm downspout discharge, inspect splash zones
-
Every 5–7 years: Full repaint cycle for many homes near the water
When Touch-Ups Are Enough—and When to Repaint
-
Touch-ups fit when:
-
Peeling is isolated and covers less than 5–10% of a wall
-
Caulk failure is narrow and not associated with softwood
-
Chalking is light and easily washed away
-
-
Full repaint is smarter when:
-
Multiple elevations show layered failures (peel, chalk, and cracks)
-
Primer is visible in several sun bands
-
Wood is soft at trim ends or sills—even after drying out
-
The last paint job is more than 8–10 years old in sun-exposed zones
-
Special Considerations for Cedar, Fiber Cement, and Older Wood Windows
-
Cedar & redwood: Tannins require stain-blocking primer once bare wood shows
-
Fiber cement: Wash thoroughly, scuff-gloss areas, use high-adhesion primer where needed
-
Historic or older wood windows: Expect glazing and putty touchups, specialty primers on sash edges, and precise caulking at stops
FAQs
How do I tell mildew from dirt or rot?
Mildew appears as clustered black or gray specks that regrow after rinsing. Dirt rinses off and stays gone. Rot affects the wood itself—if a skewer sinks in easily, you have decay, not just surface grime. Mildew is a surface issue, while rot means the wood structure is compromised and needs immediate repair.
Can I paint over peeling spots without priming?
No. You must peel to a firm edge, sand smooth, then prime bare wood with the right product for your siding. Skipping primer risks immediate failure next season. Proper prep ensures the new paint adheres well and lasts longer.
My paint is fading but not peeling—is that a problem?
Yes, fading and chalk are early warnings. They limit adhesion for new paint and signal UV damage. Wash, de-chalk, prime where needed, and repaint before cracks and peels begin. Addressing fading early prevents bigger issues.
How often should Annapolis homes be repainted?
Exposure drives the schedule. Many homes near the water are on a 5–7 year cycle for full coats, with touch-ups in between. Shadier, protected sides may last longer; sun-blasted trim may need attention sooner. Regular maintenance extends paint life.
Do you handle small repairs before painting?
Yes. We replace compromised boards, reset fasteners, re-caulk, prime, and then paint—so you’re not burying problems. Start with a quick consult, and we’ll outline an efficient repair-and-paint plan tailored to your home’s needs.

Tyler Finnigan, founder of Finn’s Painting Company, brings a lifetime of craftsmanship and dedication to his work. Raised alongside his father, Tyler honed his construction and finishing work skills, learning the value of precision and excellence. After serving in the United States Marine Corps, where he developed discipline and leadership, Tyler expanded his expertise in the luxury sector, mastering high-end project management and exceptional customer service. Today, he combines these experiences to deliver outstanding interior and exterior painting services rooted in integrity and attention to detail. Tyler’s commitment to quality ensures every home shines with beauty and lasting craftsmanship.